Overview of LCD commands
I mentioned previously that we will be using the LCD module in "8-bit mode". Additionally, the 8 bits of data that we send to the LCD can either be commands or data. As you may suspect, commands are used to tell the 44780 to do something or configure is in a particular manner. On the other hand, data is used for the printing of characters on the screen. Each character that the LCD is capable of displaying is represented by a unique 8 bit number. You can find these 8-bit values on page 15 of the data sheet. Along the upper and left hand corner of the character chart, the letters L and H represent the binary numbers 0 and 1 respectively. I assume this encoding scheme is somewhat common to many 44780's but consult your data sheet and go with whatever values it shows you. There are different versions for things like international characters etc...
Command mode vs. Character mode (RS Pin)
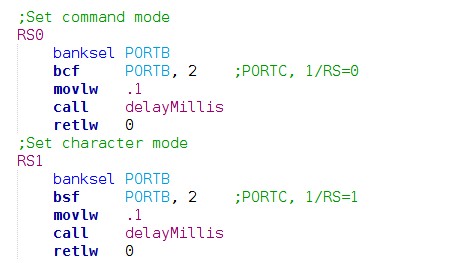
The method for letting the LCD know if our 8 bits represent a character or a command is via the RS pin (pin #4 on the LCD). When this pin is low, we are in command mode and any 8 bits communication will be interpreted as a command. When the RS pin is high, the 8 bits will be interpreted as a character to be displayed on the LCD panel. I have the RS pin of the 44780 connected to PORTB, 2 of the PIC. Putting the LCD module in command or character mode is accomplished with the following two subroutines named "RS0" and "RS1" shown below. (44780 LCD's are somewhat slow to process data and delays are used after almost everything you tell them to do. 1ms in this case.)
Sending commands/data (Enable pin)
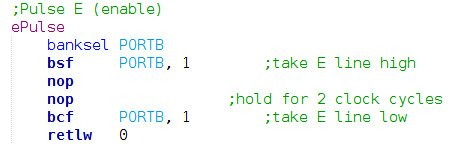
All commands and data are received on pins DB0-DB7 of the LCD module. In our example, these pins are connected to PORTD of the PIC16F1937. Therefore, in order to send an 8 bit command or 8 bit character data to the 77480, we first load the value into PORTD. We then set RS high or low depending on whether we are sending a command or data. Once everything is in place, we "pulse"" the enable pin of the LCD to transmit the 8 bits. "Pulsing" the enable pin is accomplished by driving it high for a couple of clock cycles (to ensure the module recognizes the change of state) and then bringing it low again. I have a separate subroutine named "ePulse" to handle this:
Utilizing all of the above
All of the above subroutines are accessed by two main routines named "sendCommand" and "sendData". The process involves loading an 8 bit command or character value into the work register and then calling "sendCommand" or "sendData" depending on whether the 8 bits are command or character data.
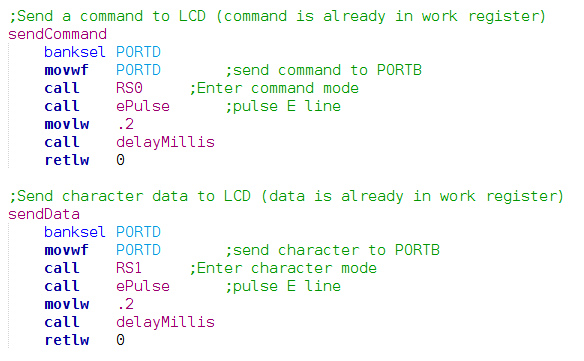
The routines will then set RS high or low and pulse the E line in order to send the byte to the LCD module.
Initializing the LCD
Before the LCD can be used to display any characters, it must first be initialized. The initialization procedure sets up the module and allows you to choose some different options regarding it's operation. This entire list of commands that can be accessed during the initialization procedure can be found on page 11 of the data sheet.
The first thing done during initialization is to allow for a 50ms delay during startup. 50ms is a generous amount of time and some spec sheets call for a shorter delay, but I figure an extra cushion can't do any harm. After this delay we then send a "Function Set" command.
| Function Set Command | |||||||||||||||
|---|---|---|---|---|---|---|---|---|---|---|---|---|---|---|---|
| Bit # | 5 | 4 | 3 | 2 | 1 | 0 | |||||||||
| Option | Always 1 | 8/4 bit mode (1=8 bit mode) | 1 or 2 line (for 2 line displays, 1=2 line mode) | 5x10 or 5x8 dots (1=5x10) | -not used | -not used | |||||||||
As a side note, while most data sheets list bit #3 of the function set command as providing a means to choose between 1 and 2 lines (ie: for a 16x2 display), I found that by setting it to 1 I was able to use all 4 lines of my 20x4 model.
I create a 50ms delay upon startup and send a function set command that gives me 8-bit mode, 4 usable lines and 5x10 dot characters with the following code:

You may find that some people repeatedly send this command several times under the assumption that the LCD module requires such a procedure to successfully initialize. I found this to be unnecessary. If you run into problems it may be something to try though.
I next configure the character entry mode. This command determines which direction the cursor moves (left or right) after each character and turns the display shift on or off.
| Character Entry Mode Command | |||||||||||||||
|---|---|---|---|---|---|---|---|---|---|---|---|---|---|---|---|
| Bit # | 2 | 1 | 0 | ||||||||||||
| Option | Always 1 | 1=increment 2=decrement | 1=shift on 2=shift off | ||||||||||||
I set the device to have an incrementing cursor and no display shift with the following code:

Finally, the "Display On/Off and Cursor" command does pretty much what it's name says
| Display On/Off and Cursor | |||||||||||||||
|---|---|---|---|---|---|---|---|---|---|---|---|---|---|---|---|
| Bit # | 3 | 2 | 1 | 0 | |||||||||||
| Option | Always 1 | 1=Display on 0=Display off | 1=underline on 0=underline off | 1=blink on 0=blink off | |||||||||||
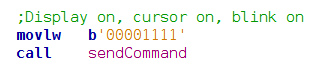
As a starting point I like to have a blinking/underline cursor since the presence of a blinking cursor means you have successfully initialized the device. Once you have the device working correctly you can turn these features off for aesthetic reasons if you desire. The following code gives you an underlined and blinking cursor:
The LCD is now initialized and all of the above-explained steps are placed in a subroutine named "LCDInit", which is called upon device startup (and is shown below:)
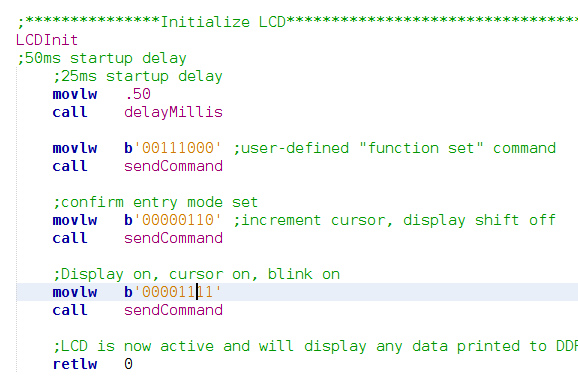
The "LCDinit" subroutine can be found in the example code file in the data sheets section.
A note about delays
I mentioned briefly about the use of delays as a means of allowing the comparatively slow 44780 module to process the data and commands that we send to it. There is also an alternative method which involves polling a busy flag on the module and waiting for it to clear before sending further commands/data. Using the busy flag is more efficient and will speed things up since using fixed delay routines means you are almost always waiting longer than you absolutely need to before continuing onward. To be honest I have never utilized this method, but if you are using the 44780 in an intensive application that requires constant update and refresh of the display information then it may be worth investigating this technique.
With the LCD configured and initialized, let's take a look at a simple example of using it to display characters.