Displaying characters by storing a string in a data table
Consider the following two subroutines used to display two strings "Hitachi" and "44780"
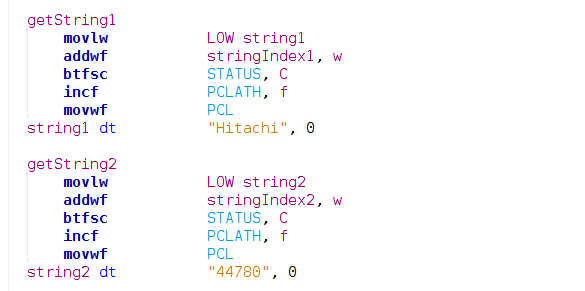
string1 dt "Hitachi", 0
You will notice the line that contains "string1 dt "Hitachi", 0". The instruction dt essentially creates a data table which defines a series of retlw instructions with arguments consisting of the ascii value of each character in the string "Hitachi". The ", 0" is the last retlw instruction and signifies the end of the string. The variable "stringIndex1" is a counter that keeps track of which character we are currently processing and needs to be zero at the start of the subroutine. "LOW string1" is the starting address for the chunk of memory set aside to hold the string "Hitachi". With each call to "getString1", we add the counter "stringIndex1" to the starting address of the string "Hitachi", grab a particular character and place it in the work register just before returning back to the main loop. Also take note of the fact that we check for an overflow of the low byte of the program counter after incrementing it. In the event that it overflows, we proceed to increment the high byte of the programs counter (PCLATH) instead.
Inside the main loop the following code sends the character to the LCD after checking whether we have reached the end of the string.
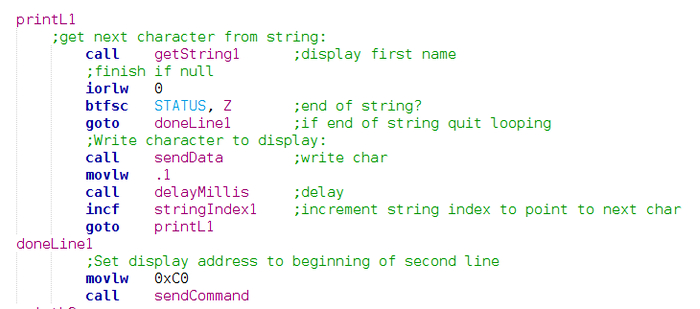
After a delay (to allow the LCD to process the data), the counter "stringIndex1" is incremented and the above process is reiterated and the next character is grabbed. Once the subroutine returns with "0" in the work register, we drop out of this section of the main loop and proceed with a similar routine to display "44780".
Jumping to different locations/lines of the LCD
You also notice the following lines of code:
movlw b'0xC0'
call sendCommand
0xC0 is the hexadecimal address of the left-most character block of the second line. Sending this value as a command causes the cursor to jump to the far left side of the second line of the display. Every character entry-point on all four lines has it's own unique memory address. Normally it's nice to know that the manufacturer's data sheet lists these memory addresses in an easy to read graphical manner. Unfortunately the listed memory addresses never seem to be correct or work. The data sheet for this device is no exception. For whatever reason they list the first two rows correctly, but then duplicate the same addresses for the second two rows. Perhaps there is something going on here I am unaware of but the memory addresses that give me working results are as follows:
| Character Entry Point Memory Addresses | |||||||||||||||
|---|---|---|---|---|---|---|---|---|---|---|---|---|---|---|---|
| Row | Address Range (from left to right) | ||||||||||||||
| 1 | 0x80 -> 0x93 | ||||||||||||||
| 2 | 0xC0 -> 0xD3 | ||||||||||||||
| 3 | 0x94 -> 0xA7 | ||||||||||||||
| 4 | 0xD4 -> 0xE7 | ||||||||||||||
Also keep in mind that you can move to addresses that are outside of the above range of values and the LCD will happily accept the command. Of course any character data you try to display to such memory addresses will never show up on the screen!
Displaying characters using ASCII values
You can also display an individual character by sending an 8 bit data byte to the LCD module. The following code displays "PIC" on line 3 of the screen followed by "16F1937" on the fourth line:

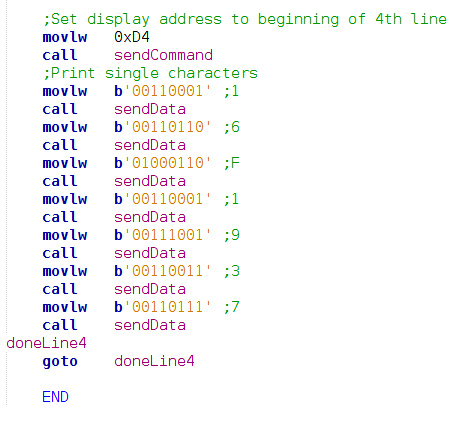
At the end of the program we enter an infinite loop as a means of ending this simple demonstration, but clearly you could play around with this code and create blinking/flashing messages using delays or create an interactive display based on various inputs. Hopefully there is enough basic information here to get you started!